 Engage students in STEM (science, technology, engineering, and math) as they learn about a tree’s lifecycle. The suggestions below are enrichments for Project Learning Tree’s Tree Lifecycle activity, found in PLT’s PreK-8 Environmental Education Activity Guide. Be sure to check out the full lesson!
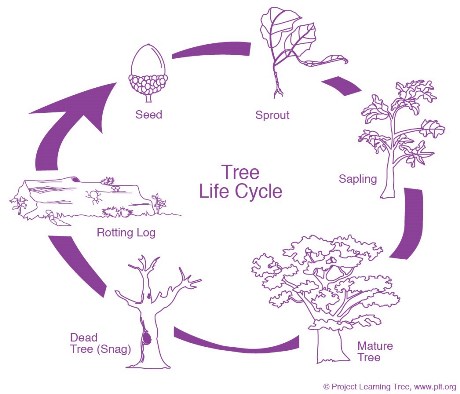
Getting Started: Help students explore the stages of a tree’s lifecycle by showing the Tree Lifecycle video, which corresponds with this Tree Lifecycle diagram. You can also share time lapse photography of the Life Cycle of a Pine Tree and watch the video How Does a Tree Grow in Nature.
Essential Question(s): What changes occur in a tree and how does it interact with its environment as it moves from one stage in its lifecycle to the next?
Task: Challenge students to observe and synthesize the lifecycle of a tree by creating a 3-D lifecycle model or a timeline model. Compare growth during each lifecycle stage, and design a protective device for a sapling.
NGSS Connections:
- Next Generation Science Standard: 3-LS1-1 From Molecules to Organisms: Structures and Processes – Develop models to describe that organisms have unique and diverse life cycles but all have in common birth, growth, reproduction, and death.
- Next Generation Science Standard: 3-5-ETS1 Engineering Design – Generate and compare multiple possible solutions to a problem based on how well each is likely to meet the criteria and constraints of the problem.
Lifecycle Models
Elementary
Review the lifecycle of a tree, then have students create a 3-D model that shows each stage. This activity can be done as a class, in small groups, or individually. Provide materials such as: large paper plates or large circles cut out of poster board, tree seeds (e.g., pine nuts), yarn, pipe cleaners, construction paper, glue, tape, markers. Tell students that there is no right or wrong way to make their models, but that they should plan and design their model before they start assembling it.
Middle and High School
Using the internet for research, collect pictures or graphics of a specific species of tree in all different stages of its life cycle. Create a timeline model using a tool like this free Microsoft PowerPoint timeline template.
STEM Strategies
Science
Seedling Experiments
Conduct a seed germination experiment so students see up close what would actually be happening underground.
Materials: Seeds (e.g., bean, squash); potting soil; paper towels; cups/containers.
- Ask students what seeds need to germinate (moisture and warmth) and grow (water, correct temperature, light, and a good location such as in soil).
- Provide each student with the materials above.
- Discuss the terms control (what will stay the same in their experiment) and variables (what conditions will vary).
- Challenge students to design experiments on the factors that affect seed germination and growth. Have them hypothesize what will happen in their experiment.
- For one to three weeks, have students monitor their experiments, recording dates, observations, and measurements.
- Analyze and discuss findings.
Technology
Identify Trees
 Have students explore the school grounds or nearby natural area to look for trees in all the different stages of a tree’s lifecycle.
- Challenge students to identify the trees they observe using an interactive online Tree Identification Guide or the free LeafSnap
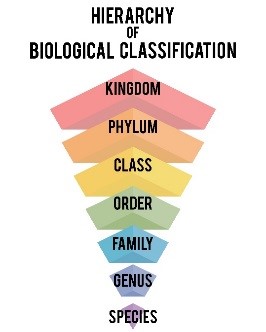
- Record both common and scientific names. Remind students that scientists use a naming system, called taxonomy, to organize all living things on earth. Tree species are given scientific names as a part of this hierarchy of biological classification (see image). For example, White Oak is a member of the Fagaceae family, the genus is Quercus and the species is alba. Trees are organized into this hierarchy based on their appearance, reproduction, growth characteristics, and other variables.
- Challenge students to make their own tree identification guide for several species of trees on the school grounds.
Engineering
Design a Protective Device for a Sapling
Saplings often do not survive to become a mature tree because they are trampled, eaten by wildlife, freeze, or suffer from drought. Challenge students to sketch designs of how they would protect saplings from these scenarios:
- Protect sapling from being eaten by deer and rabbits
- Protect sapling from being trampled
- Protect sapling from drought
- Protect sapling from freezing temperatures
Materials: Use common items such as burlap, aluminum foil, rubber bands, zip ties, wire mesh, stakes, string, scissors, and plastic tubing or empty plastic soda bottles.
- If feasible, build the devices and use them to protect saplings on the school grounds or nearby area.
- Check the following links for inspiration:
Math
What’s the Value of that Tree?
Calculate the dollar value and ecosystem services of a tree during the following life stages: sapling, young tree, and mature tree.
Materials: Large tape measure, calculator, computer and internet access.
- For one species of tree, find a sapling, young tree, and mature tree.
- Measure the circumference of the trees at 4.5 feet above the ground; then calculate the diameter.
- Go to treebenefits.com/calculator to calculate the dollar value and ecosystem services.
- Record and graph the results.
- Discuss: Were you surprised how the dollar value of the trees varied by its lifecycle stage? Did you realize all the ecosystem services trees provide? Why is it important to care for trees during each stage of its lifecycle?
Additional Resources
Don’t have PLT’s PreK-8 Environmental Education Activity Guide?
- Purchase a print guide or e-book, available from PLT.org, Amazon and other places where books are sold.
- Get it through your PLT State Coordinator along with hands-on professional development, alignments to state standards and other state-specific supporting resources.
Don’t consider yourself a formal teacher?
- Check out PLT’s Tree Lifecycle family activity. We have 40+ nature activities for families that can be easily used by parents, grandparents, youth group leaders, nature centers, and other nonformal programs.


